View 설정
간단하게 OpenCV를 통해 이미지를 불러와 GrayScale된 상태로 바꿔 출력해보려고 한다!
우선 간단하게 activity_main 중간에 이미지를 출력하고, 투명하게 버튼 두개를 만들어 asset 내 이미지를 변경하며 아래와 같이 출력할 수 있게 할 것이다.
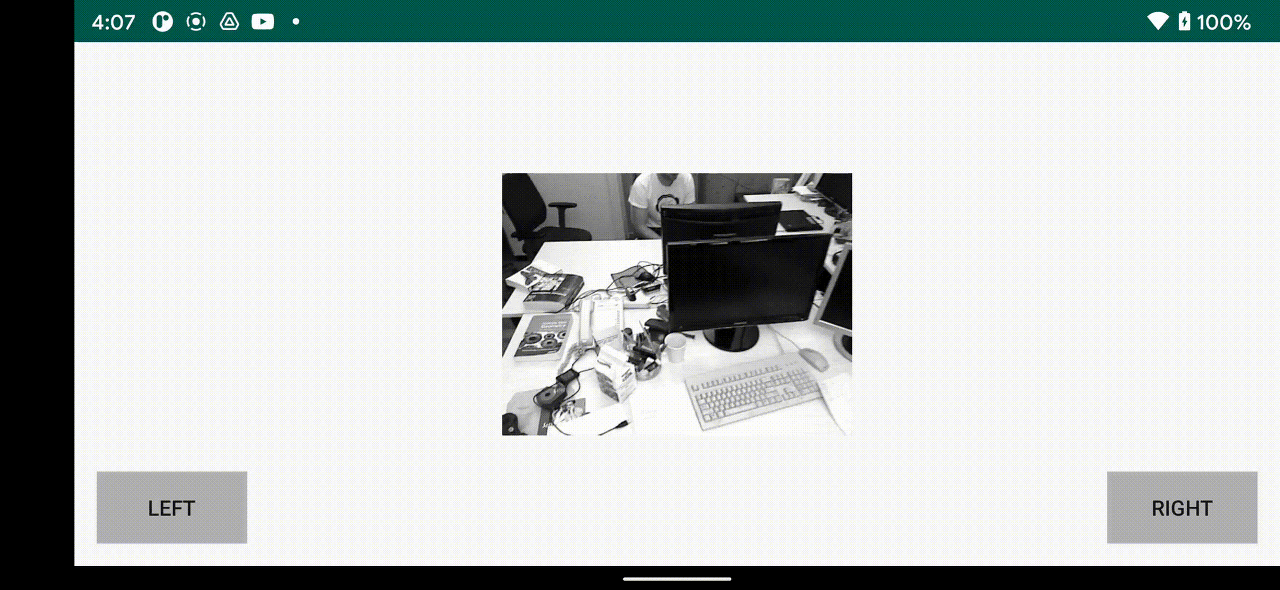
이런 느낌으로!!
기본 설정
ActionBar 삭제
기본 설정으로 모바일 디바이스에 업로드한다면 위에 액션바가 있는 것을 알 수 있다.
이를 없애기 위해 res - values - styles.xml을 클릭해
<style name="AppTheme" parent="Theme.AppCompat.Light.DarkActionBar">NoActionBar로 바꿔준다
<resources>
	<!-- Base application theme. -->
    <style name="AppTheme" parent="Theme.AppCompat.Light.NoActionBar">
    	<!-- Customize your theme here. -->
        <item name="colorPrimary">@color/colorPrimary</item>
        <item name="colorPrimaryDark">@color/colorPrimaryDark</item>
        <item name="colorAccent">@color/colorAccent</item>
    </style>
</resources>
AndroidManifest
VGA 이미지가 기본이므로 Landscape로 이미지 화면을 가로로 고정한다.
<?xml version="1.0" encoding="utf-8"?>
<manifest xmlns:android="http://schemas.android.com/apk/res/android"
    package="edu.android.project.opencv_kotlin_test">

    <application
        android:allowBackup="true"
        android:icon="@mipmap/ic_launcher"
        android:label="@string/app_name"
        android:roundIcon="@mipmap/ic_launcher_round"
        android:supportsRtl="true"
        android:theme="@style/AppTheme">
        <activity android:name=".MainActivity"
            android:screenOrientation="landscape">
            <intent-filter>
                <action android:name="android.intent.action.MAIN" />

                <category android:name="android.intent.category.LAUNCHER" />
            </intent-filter>
        </activity>
    </application>

</manifest>
activity_main
ImageView
어플 중앙에 ImageView를 크게 넣어보려고 한다.
ConstraintLayout은 top, bottom, end, start를 효과적으로 배치해야 한다.
나는 사진이 원래 이미지로 나오기를 원하므로 wrap_content로 선언한다.
ImageView를 layout 내에 추가하고 parent에 모든 방향을 맞춰준다.
contraintlayout에 대해서는 추후 정리한 글을 올려보겠다!
<ImageView
        android:id="@+id/imageView"
        android:layout_width="wrap_content"
        android:layout_height="wrap_content"
        app:layout_constraintBottom_toBottomOf="parent"
        app:layout_constraintEnd_toEndOf="parent"
        app:layout_constraintStart_toStartOf="parent"
        app:layout_constraintTop_toTopOf="parent" />
Button
버튼은 left, right로 이미지를 바꿔주려고 하므로 왼쪽, 오른쪽 아래에 Button을 생성한다.
이때 Button 디자인의 자율성을 위해 AppCompatButton으로 선언하여 진행한다.
왼쪽 Button 기준으로 start와 bottom을 parent에 맞춘 후, margin을 15dp 준다.
이때 android의 color는 #xxxxxxxx 8글자로 표현되며 아래와 같이 나타낸다.
투명도 / 적색 / 녹색 / 청색
따라서 color의 투명도를 40으로 설정해 75% 정도의 투명도를 설정한다.
<androidx.appcompat.widget.AppCompatButton
        android:id="@+id/leftButton"
        android:layout_width="100dp"
        android:layout_height="wrap_content"
        android:layout_margin="15dp"
        android:background="#40000000"
        android:text="left"
        app:layout_constraintBottom_toBottomOf="parent"
        app:layout_constraintStart_toStartOf="parent" />

    <androidx.appcompat.widget.AppCompatButton
        android:id="@+id/rightButton"
        android:layout_width="100dp"
        android:layout_height="wrap_content"
        android:layout_margin="15dp"
        android:background="#40000000"
        android:text="right"
        app:layout_constraintBottom_toBottomOf="parent"
        app:layout_constraintEnd_toEndOf="parent" />
Result
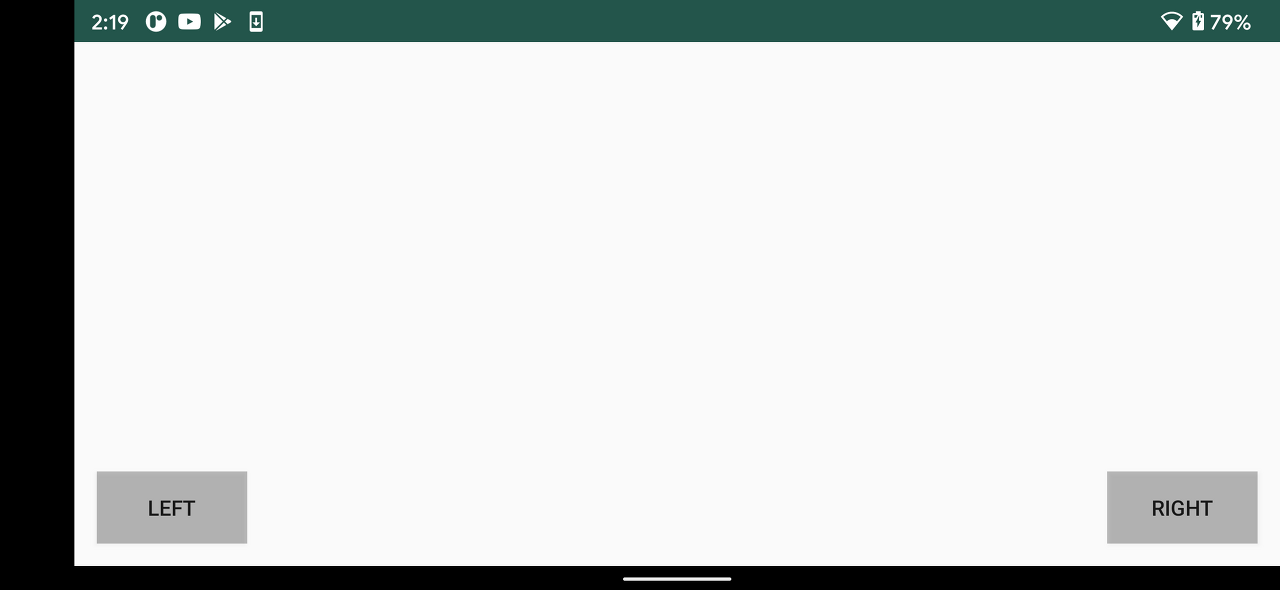
그럼 이제 아래와 같은 결과를 얻을 수 있다!!
중간은 비어있지만 추후 asset의 이미지를 불러와 채워보겠다.
'IT > Android' 카테고리의 다른 글
| [OpenGL ES] Android NDK 환경에서 glm 라이브러리 사용하기 (0) | 2021.09.01 |
|---|---|
| [Android] kotlin으로 NDK 환경 FAST keypoint detetion (0) | 2021.08.03 |
| [Android] Android으로 OpenCV 사용하기 - 3 (0) | 2021.08.03 |
| [Android] Android으로 OpenCV 사용하기 - 1 (0) | 2021.08.03 |